You’ve seen them in lush cottage gardens and elegant backyards—graceful garden arches draped with climbing roses, morning glories, or even cucumbers. More than just a decorative feature, a garden arch adds vertical growing space, defines garden zones, and creates a living gateway that transforms your outdoor space. Whether you’re building a quick, budget-friendly cattle panel arch or a refined redwood trellis, this guide shows you how to build a garden arch that’s strong, beautiful, and built to last.
With clear steps, material lists, and pro tips from real-world testing, you’ll learn how to choose the right design for your garden, install it securely, and support heavy vines without collapse. From under-$50 DIY builds to custom wooden masterpieces, we’ll walk you through every stage—so you can enjoy a stunning, functional arch in as little as an hour.
Choose the Right Garden Arch for Your Space

Cattle Panel Arch: Fast, Strong, and Budget-Friendly
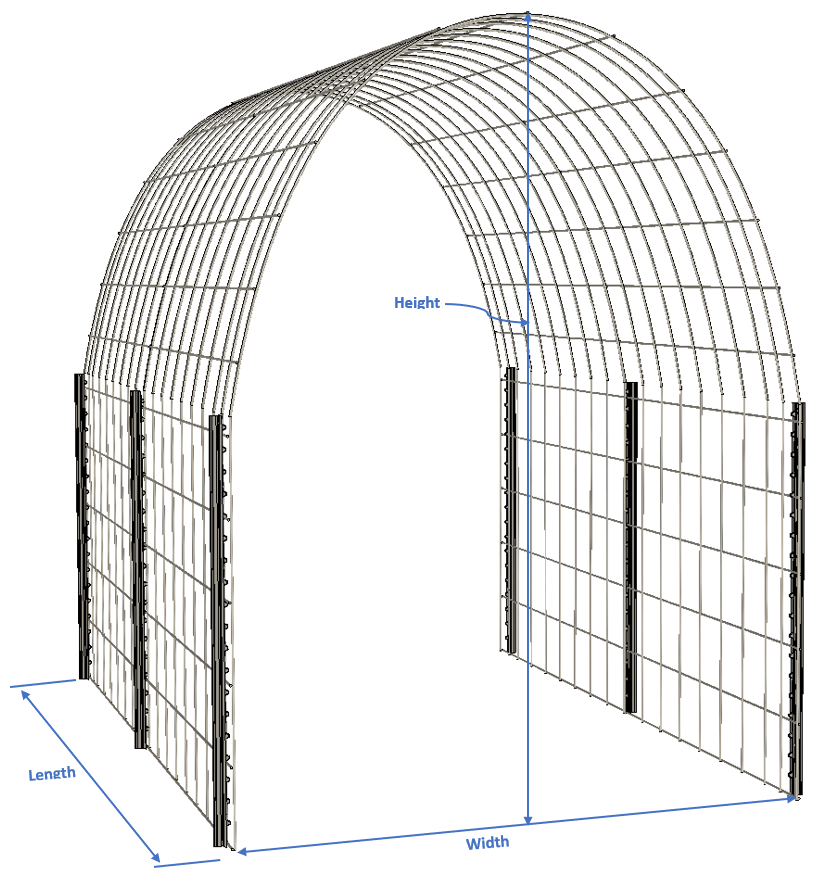
Ideal for vegetable gardens, this arch uses a 16-foot cattle panel bent into a graceful curve and anchored with T-posts. It’s perfect if you want a durable, low-cost structure in under an hour. Supports heavy crops like melons, squash, and pole beans. Best for beginners.
Redwood Trellis Arch: Elegant and Long-Lasting
Crafted from redwood 1×6 boards with routed curves and half-lap joints, this arch offers a polished, custom look. Requires intermediate woodworking skills but ages beautifully in dry climates. Ideal for ornamental gardens with jasmine, clematis, or bougainvillea.
Multi-Arch Designs: Create a Garden Walkway or Seating Area
Combine two or more arches to form a shaded tunnel or enclosed sitting zone. You can also integrate the arch with raised beds for added height and stability. Great for small-space gardening or drought-tolerant landscapes.
Gather Tools and Materials by Arch Type
Cattle Panel Arch Supplies and Tools
Materials:
• 16-foot cattle panel (4 ft high)
• 2–4 x 6-foot T-posts or 4×6 fence posts
• Heavy-duty outdoor zip ties or galvanized wire
• Rebar or stakes (optional, for soft soil)
• Coaxial cable staples (if attaching to raised beds)
Tools:
• Post driver
• Measuring tape
• Level
• Work gloves
• Shovel
• Staple gun (for bed lining)
This setup costs under $50 and uses widely available materials from Lowe’s or ranch supply stores.
Redwood Arch Materials and Tools
Materials:
• Four redwood 1×6 boards (8–10 ft long)
• 6-inch reinforced wire mesh
• Steel stakes (for ground mounting)
• Wood glue, 3-inch exterior screws
• Wood plugs and cap stock
• 3/8-inch drill bit
Tools:
• Circular saw
• Router with flush trim bit
• Router table (can be DIY)
• Clamps
• Drill
• Plug cutter
• Dust extraction system (recommended)
Redwood resists rot naturally, making it ideal for hot, dry climates like Southern California.
Plan Your Garden Arch Dimensions
Match Arch Span to Bed Width
• 4-foot beds: Cut the cattle panel in half (8 ft) for less bowing and better stability
• 5-foot beds: Use the full 16-foot panel; expect slight lateral spread
• 6-foot span: Ideal for walk-through access and visual impact
Test the curve by temporarily positioning the panel between beds. Adjust spacing until the peak reaches 77–78 inches (about head height).
Increase Height With Raised Beds
An 18-inch raised bed adds over a foot of vertical clearance. Elevating the arch also improves stability and keeps the base dry. Slide the panel between the bed and T-post on each side for a secure fit.
Prepare the Installation Site
Mark and Level the Arch Location
Decide where the arch will go—back of the bed for ornamentals, center for maximum growing space, or front for full vine coverage. Use a level to mark post locations. If placing over lawn, dig out grass between beds.
Install Ground Anchors
Drive T-posts or rebar 2.5 feet into the ground, leaving 3.5 feet above ground. Use a post driver for hard soil. Position one post at each end of the bed span. Ensure they’re plumb and aligned with your garden layout.
Build a Cattle Panel Garden Arch
Bend and Position the Cattle Panel
Lift the 16-foot cattle panel between the two T-posts. Let it naturally form an arch. If it slips, use a wooden block or have a helper hold it in place. The panel should peak around 77–78 inches.
Secure the Panel to Posts With Zip Ties
Wrap heavy-duty outdoor zip ties around the panel and each T-post at three points: top, middle, and base. Loop the tie through the panel and around the post’s ridges. Tighten until it clicks. Use 2–3 ties per side for full stability.
Pro Tip: Replace plastic ties with galvanized wire later for a cleaner, longer-lasting look.
Reinforce Base to Raised Beds (Optional)
If using raised beds, nail coaxial cable staples into the back wall to anchor the panel’s base. This prevents shifting and adds rigidity, especially in windy areas.
Build a Redwood Trellis Arch
Create a Router Template for Smooth Curves
Cut two plywood pieces into identical arch shapes. Clamp them to a 90° workbench to ensure a flat, stable base. Use a router with a flush trim bit to shape the redwood boards. A stable template is critical for smooth, repeatable curves.
Cut and Join the Frame With Half-Lap Joints
Trace the template onto four 1×6 redwood boards. Cut with a circular saw, then clean edges with the router. Join the top and side pieces with half-lap joints.
Warning: Redwood is soft—dry-fit joints first. Stress tests show half-lap joints can fail under tension without reinforcement.
Reinforce With a Horizontal Collar Tie
Cut a collar tie using the same template. Attach it beneath the arch peak with wood glue and screws. This transforms a fragile frame into a sturdy structure. Clamp while drying.
Attach Wire Mesh for Climbing Plants
Stretch 6-inch reinforced wire mesh over the arch. Staple it tightly, pressing down to flatten springiness. This gives vines like jasmine or ivy a strong climbing surface.
Mount and Finish the Redwood Garden Arch
Elevate the Arch With Steel Stakes
Pre-drill 3/8-inch holes in the base of each post. Insert steel stakes into the ground, then slide the arch onto them. Keeping wood off the soil prevents rot and extends lifespan.
Hide Screw Holes With Custom Wood Plugs
Cut plugs with a plug cutter to match the grain. Fill screw holes, then sand smooth. This creates a seamless, professional finish.
Install Weatherproof Cap Stock
Attach cap stock to the top of each post with screws. Pre-drill to avoid splitting. The cap shields wood from rain and UV damage, significantly extending the arch’s life.
Plant and Train Vines on Your Arch
Best Plants for Garden Arches
Vegetables & Fruits:
• Pole beans
• Peas
• Cucumbers
• Climbing tomatoes
• Squash
• Melons
Ornamental Vines:
• Morning glories
• Climbing roses
• Clematis
• Jasmine
• Ivy
• Bougainvillea
Planting and Training Tips
• Sow seeds or transplant seedlings at the base of the arch
• For back-of-bed placement, plant ornamentals like roses behind the arch
• Water at the base to prevent fungal diseases on leaves
• Guide young vines onto the structure with soft ties
Maintain Your Garden Arch for Longevity
Cattle Panel Arch Maintenance
• Check zip ties annually—replace if brittle or cracked
• Upgrade to galvanized wire for better weather resistance and aesthetics
• Inspect T-posts after storms; re-drive if loose
• Reinforce with extra ties if growing heavy crops
Redwood Arch Maintenance
• Redwood resists rot naturally but benefits from caps and elevated mounting
• Collar tie prevents long-term sagging—don’t skip this step
• No staining required—the wood weathers to a silvery gray over time
• After 9 months of growth, tested arches remained stable under mature foliage
Fix Common Garden Arch Problems
Arch Wobbles or Shifts
Cause: Lack of vertical support
Fix: Install T-posts driven 2.5 feet into the ground. For raised beds, use coaxial staples to anchor the base.
Panel Slips During Setup
Cause: Unstable positioning
Fix: Use a wooden block to brace the panel or have a helper hold it while securing.
Wood Joints Fail
Cause: Soft redwood and weak half-lap joints
Fix: Add a collar tie for full-width reinforcement. Always dry-fit before gluing.
Fasteners Degrade
Cause: UV exposure weakens plastic zip ties
Fix: Replace with galvanized wire or check annually.
Rodents Enter Beds
Cause: Open bottom
Fix: Line bed bases with wire mesh and cover with cardboard for weed suppression.
Optimize Your Arch for Garden Design
Create a Garden Walkway With Two Arches
Build two arches 6–8 feet apart to form a tunnel. Train vines to grow across both for a lush, shaded path. Ideal for small-space gardens or cottage-style landscapes.
Build a Covered Seating Area
Add a third arch to enclose a sitting zone. Drape with bougainvillea or wisteria for privacy and shade. Perfect for patios or backyard corners.
Use as a Visual Gateway
Place a single arch at the entrance to a vegetable patch or flower garden. Lets you keep the front open for seasonal plants while the arch becomes a living focal point.
Cattle Panel vs. Redwood Arch: Cost and Time Comparison
| Feature | Cattle Panel Arch | Redwood Arch |
|---|---|---|
| Cost | Under $50 | $150+ (premium materials) |
| Build Time | 30–60 minutes | 6–12 hours |
| Skill Level | Beginner | Intermediate-Advanced |
| Tools Needed | Post driver, level | Router, saw, clamps |
| Weight Capacity | Heavy (melons, squash) | Medium (vines, flowers) |
| Lifespan | Years (minimal care) | Decades (with caps) |
Frequently Asked Questions About Building a Garden Arch
Can I build a garden arch without power tools?
Yes, especially for a cattle panel arch. You only need a post driver, zip ties, and basic hand tools. No sawing or routing required.
How tall should a garden arch be?
Aim for 77–78 inches at the peak—just under head height. This allows comfortable walking through while maximizing vertical growing space.
What’s the best wood for a garden arch?
Redwood is ideal for dry climates due to its natural rot resistance. Cedar and pressure-treated pine are also good options, but redwood ages most gracefully.
Can a garden arch support heavy vegetables like melons?
Yes, a cattle panel arch with T-post anchors can support melons, squash, and cucumbers. Use slings made from fabric or netting to support heavy fruit.
How do I keep my wooden arch from rotting?
Keep the base off the ground with steel stakes, add cap stock to the top, and use a collar tie for reinforcement. These steps prevent moisture buildup and extend lifespan.
How do I attach vines to the arch?
Guide young vines by hand and use soft plant ties. For wire mesh, simply weave stems through the openings as they grow.
Key Takeaways for Building a Durable Garden Arch
A garden arch is more than a trellis—it’s a living sculpture that evolves with your garden. Whether you choose a simple cattle panel build or a handcrafted redwood masterpiece, the right design and construction will give you years of beauty and bounty.
• Always reinforce joints and elevate wood off the ground
• Use T-posts or stakes for stability, especially with heavy crops
• Start simple and upgrade over time—zip ties can become galvanized wire
With strong supports, smart materials, and a few pro techniques, you can build a garden arch that stands tall, grows lush, and becomes the centerpiece of your outdoor space.