
Installing garden lights instantly elevates your outdoor space—adding safety, charm, and usability after dark. Whether you’re illuminating a stone path, highlighting a favorite tree, or creating ambiance on your deck, a well-designed lighting system transforms your garden into a nighttime retreat. The best option for most homeowners? A low-voltage 12V system. It’s safe to install without an electrician, affordable, and fully customizable. Unlike solar lights that fade in winter or costly mains-powered setups, 12V lighting delivers consistent brightness, weatherproof performance, and the flexibility to adjust or expand your layout anytime. This guide walks you through every step—from planning your design and sizing your transformer to burying cables and testing your system—so you can install professional-quality garden lighting in a weekend, no electrical certification required.
Choose the Best Garden Lighting System
Why 12V Low-Voltage Lighting Is Ideal
For most residential gardens, 12V low-voltage systems are the top choice. They operate safely at just 12 volts, eliminating the risk of electric shock even if a wire is cut. These systems use a transformer to convert household power (120V in the US, 240V in the UK/EU) into safe 12V AC, powering everything from path lights to spotlights. You can install it yourself, modify the layout later, and expand as needed. Cables are durable, connectors are weatherproof, and performance remains strong year-round—unlike solar alternatives that dim over time.
Why to Avoid Solar and Mains-Powered Lights
Skip solar-powered lights—they’re unreliable. Weak batteries fail within months, output dims quickly, and performance drops in cloudy weather or winter. While they require no wiring, their fixed positions and poor longevity make them a false economy. Avoid mains-voltage (120V/240V) systems unless hiring a licensed electrician. They’re expensive, code-compliant, and inflexible—each light costs £40–£45 ($50–$57) and must be professionally installed. For 99% of homeowners, low-voltage is safer, cheaper, and just as effective.
Match Light Types to Garden Areas
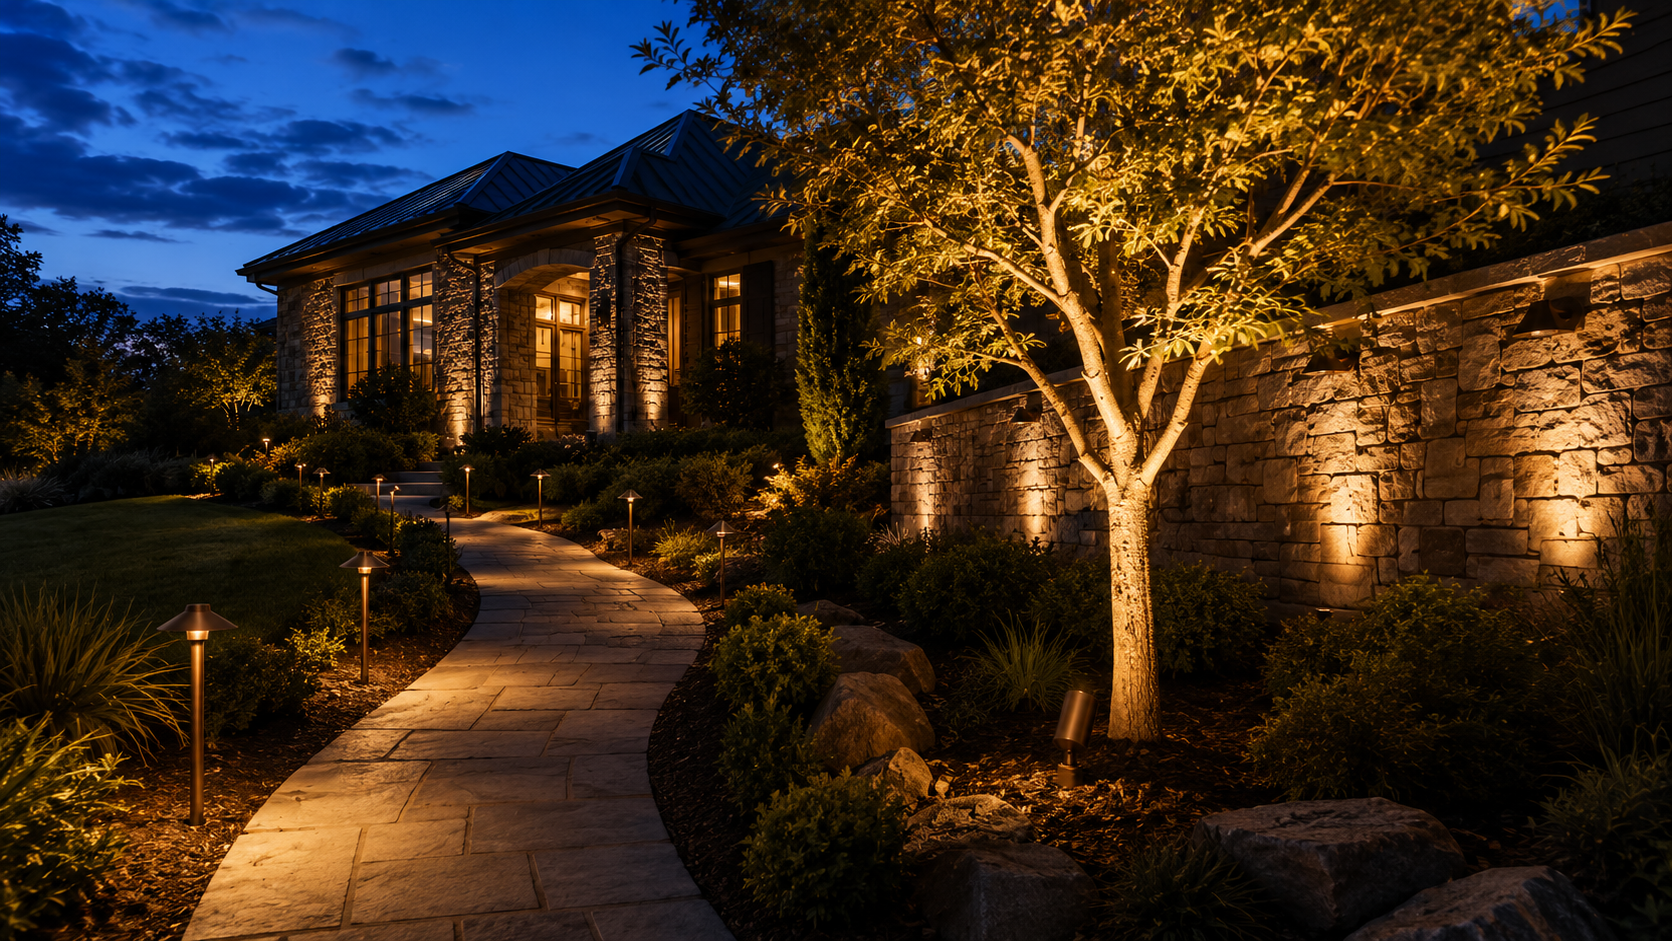
Use different fixtures for different purposes. Path lights mark walkways and steps—place one every 6–8 feet. Bollard lights offer ambient glow along borders. Spike-mounted spotlights highlight trees or shrubs—position 1 foot from the base and angle upward. Deck lights install flush in wooden surfaces for step safety. Up lights create dramatic silhouettes under archways or planters. Plan each fixture type based on function and visual impact.
Plan Your Garden Lighting Layout

Draw a Scale Map of Your Garden
Start with a hand-drawn or digital sketch of your garden. Include paths, steps, trees, decks, and key features. Mark where you want light: along walkways, near entrances, around seating areas, or on architectural details. This map prevents guesswork during installation and helps calculate cable runs and power needs. Use graph paper or free apps to maintain scale—1 square = 1 foot or 1 meter.
Position Fixtures for Maximum Impact
Keep path lights at least 12 inches (30cm) from edges to avoid tripping and maintain clean lines. For tree uplighting, place spotlights 12 inches from the trunk, aiming upward to illuminate bark and canopy. Use three-way splitters to branch cables and light multiple features from one run. Avoid placing lights in high-traffic zones or future planting areas. Leave extra cable (2–3 feet) at each fixture for repositioning as plants grow.
Map Cable Routes to Minimize Damage
Route cables along garden bed edges or behind fences—not across lawns or under footpaths. This minimizes damage from mowing or digging. Run cables from the transformer to the farthest light, working backward. If crossing a wall or fence, plan the entry point—drill a hole and use conduit. For decks, route cables underneath to avoid trenching. Note total cable length; standard pre-wired runs come in 10m (33 ft) or 15m (49 ft) lengths.
Select Components and Calculate Power Needs
Size Your Transformer Based on Total Wattage

The transformer converts household power to 12V and must handle your total wattage. Most homes use a 150-watt outdoor-rated (IP65) transformer. Add up the wattage of all planned lights. For example: two 50W tree lights (100W), six 1W bollards (6W), four 20W garden lights (80W), and seven 1W deck lights (7W) = 193W total. Since this exceeds 150W, use two transformers—one for 106W (trees + bollards), another for 87W (garden + deck).
Use Pre-Wired Cables for Faster Installation
Opt for pre-wired 12/2 gauge cables with push-fit connectors—they’re faster and more reliable. These come with sockets every 2m (6.5 ft), waterproof joints, and no splicing needed. A 10m starter cable runs from the transformer to the first light. For longer runs, connect additional cables using weatherproof splitters. If custom wiring is needed, use direct-burial 12/2 cable and seal joints with brass barrel connectors and heat-shrink sleeves.
Choose Weather-Resistant Fixtures
Low-voltage fixtures cost £10–£15 ($13–$20) each, far less than mains equivalents. Choose IP-rated, weather-resistant models with gasketed seals. Spike lights are easiest—just push into soil. Bollards mount on surfaces. Deck lights require a 60mm hole saw for flush installation. Use LEDs for longevity or halogen for warmer tones (though they consume more power and last less).
Install the Transformer Safely
Mount the Transformer Indoors or in a Weatherproof Box
Place the transformer indoors (garage, porch, utility room) to extend its life. If mounting outside, use an IP65-rated weatherproof enclosure under eaves or a covered wall. Never leave it exposed to rain. Keep it near a GFCI-protected outdoor outlet (US) or standard outdoor socket (UK/EU). Plug it in only after all connections are secure.
Connect the Transformer to Power and Cable
Plug the transformer into the outlet. Connect the 12V cable’s two wires to the transformer terminals:
• White (common) wire → COM terminal
• Black (hot) wire → 12V terminal
Tighten screws firmly. Use 20mm uPVC conduit when routing cable through a wall. Drill a hole, insert the conduit, feed the cable through, and seal around it with silicone to block moisture.
Run and Protect Garden Lighting Cables
Bury Cables 4–6 Inches Deep
Dig a shallow trench 4–6 inches (10–15cm) deep using a flat shovel. Start at the farthest light and work back toward the transformer. Lay the cable gently, avoiding sharp bends. Leave a small coil of extra wire at each fixture location for future adjustments. Backfill soil gradually, tamping lightly.
Use Conduit for High-Traffic Crossings
When crossing under a path, driveway, or wall, sink 20mm uPVC conduit 2–3 inches deep instead of burying bare cable. Feed the cable through—this protects against foot traffic and digging. For fence runs, use cable ties to secure cables behind posts, keeping them hidden and taut. Under decks, clip cables to joists to avoid damage.
Avoid Future Digging Zones
Don’t bury cables near tree roots, irrigation lines, or future planting areas. Stay clear of zones where you’ll dig later. If rerouting is needed, low-voltage systems allow easy modifications—just dig up the cable, adjust, and rebury.
Install and Connect Light Fixtures
Set Spike and Bollard Lights
For spike lights, push the metal rod into the ground at your marked spot. For bollards, mount on a flat surface using included hardware. Angle spotlights to highlight tree trunks or garden features. Snap the fixture’s connector into the cable socket—push-fit joints click securely and seal out water. No tools needed.
Install Deck Lights Flush with the Surface
Mark the center point on your deck. Use a 60mm hole saw and drill to cut a clean opening. From below, feed the light’s extension cable through the hole. Insert the fixture and push until flush. Tuck the cable under the deck and secure with clips. Ensure the top sits level with the decking to prevent tripping.
Branch Cables with Three-Way Splitters
To light multiple areas, use a three-way splitter to divide one cable run into two or three directions. Ideal for lighting a tree cluster, feature bed, or multiple steps. Connect each arm to a new cable section, then route to fixtures. All joints are gasketed—just push together until they click.
Seal Connections and Weatherproof the System
Use Heat-Shrink for Custom Cable Splices
If splicing cables manually, use brass barrel connectors with Allen screws. Strip ½ inch of insulation, insert wires, and tighten. Slide a heat-shrink sleeve with adhesive lining over the joint. Apply heat with a heat gun or lighter—the sleeve shrinks and the adhesive seals out moisture. Test connections before burial.
Rely on Push-Fit Connectors for Pre-Wired Systems
Pre-wired systems eliminate splicing. Gasketed connectors snap together, forming a waterproof seal. Ensure each connection is fully seated—listen for the click. Do not bury until you’ve tested the entire run. Check that gaskets are intact and no wires are exposed.
Seal Wall Penetrations to Prevent Leaks
Where cables enter your home, seal around the conduit with silicone caulk. This prevents water from tracking inside. Use outdoor-rated cable glands if available. Keep the entry point above ground level and angled downward to shed rain.
Automate Your Garden Lighting
Add a Photocell for Dusk-to-Dawn Operation
Install a photocell sensor so lights turn on automatically at dusk and off at dawn. Most transformers have a built-in photocell or a port for an external one. This eliminates manual switching and ensures your garden is lit every night—ideal for security and convenience.
Pair with a Timer to Save Energy
Use a mechanical or digital timer to set a shutdown time—e.g., 10 PM. This saves energy and extends bulb life. Set the system to turn on at dusk (via photocell) and off at a fixed time (via timer). No more lights burning all night.
Enjoy Fully Automatic Lighting
With both controls, your system runs itself. Lights come on when needed, stay on during peak evening hours, then shut off. You gain safety, ambiance, and efficiency—without lifting a finger.
Test and Troubleshoot Your Lighting System
Test Before Burying Any Cables
Always test every connection before backfilling. Plug in the transformer and verify all lights turn on. Check for flickering or dimness. Use a multimeter to confirm 12V at the farthest fixture. If a light fails, swap it with a working one to isolate the issue—fixture vs. connection.
Fix Common Garden Lighting Problems
• No light? Check connections, transformer power, and bulb integrity.
• Dim lights? Verify transformer isn’t overloaded. Long cable runs (>50 ft) may need thicker gauge wire.
• Flickering? Look for loose joints or water in connectors. Re-seal with heat-shrink or replace.
• Partial failure? A bad splitter or cut cable may be the culprit—inspect visually.
Adjust and Fine-Tune Light Positions
After testing, tweak light angles or positions. Reposition a spotlight to better highlight a tree. Move a path light slightly for even spacing. The beauty of low-voltage systems? No rewiring needed—just unplug, adjust, and reconnect.
Frequently Asked Questions About Installing Garden Lights
Can I install garden lights myself without an electrician?
Yes, you can install a 12V low-voltage system safely without an electrician. These systems use safe, low voltage and plug into a standard outdoor outlet. All connections are tool-free or simple screw terminals. Just follow the manufacturer’s instructions and keep the transformer dry.
How deep should I bury garden lighting cables?
Bury low-voltage cables 4–6 inches (10–15cm) deep. This protects them from mowing and light digging while being shallow enough to avoid deep excavation. Use 20mm uPVC conduit when crossing paths or driveways for extra protection against foot traffic.
Do garden lights need to be on a timer?
While not required, using a timer saves energy and extends bulb life. Pair a timer with a photocell so lights turn on at dusk and off at a set time—like 10 PM. This ensures safety and ambiance without running all night.
Can I mix LED and halogen lights on the same circuit?
Yes, you can mix LED and halogen lights on the same 12V system, but calculate total wattage carefully. Halogen bulbs use more power (e.g., 20W) than LEDs (1–5W), so ensure your transformer can handle the combined load. Group high-wattage lights on their own transformer if needed.
What should I do if some lights are dim?
Dim lights often mean the transformer is overloaded or the cable run is too long. Check total wattage against transformer capacity. For long runs, use thicker 10/2 gauge cable or add a second transformer. Also inspect connections for corrosion or poor contact.
How do I expand my garden lighting later?
Low-voltage systems are easy to expand. Use a three-way splitter to add a new cable run, or connect an extension to an existing socket. Just ensure your transformer has enough capacity. If not, add a second transformer for the new lights.
Key Takeaways for Installing Garden Lights
Installing garden lights is a weekend DIY project with lasting rewards. A 12V low-voltage system gives you safety, beauty, and flexibility—all at a fraction of the cost of professional or mains-powered setups. By planning your layout, sizing the transformer, using pre-wired cables, and sealing connections, you’ll create a reliable, automatic lighting display that enhances your garden for years. Skip solar, avoid mains, and build smart with low-voltage—your garden’s nighttime transformation starts now.



