
You step outside, coffee in hand, ready to enjoy your garden—only to find tangled vines, overcrowded beds, and herbs lost under weeds. Sound familiar? How to organize a garden isn’t just about neatness—it’s about creating a system that grows more food, saves time, and feels joyful to maintain.
A well-organized garden starts long before you plant a seed. It begins with smart planning, efficient layout, and working with nature—not against it. Whether you’re starting fresh or fixing a chaotic plot, these 10 actionable steps will help you design a garden that’s productive, easy to manage, and beautiful all season long. By the end of this guide, you’ll know exactly where to place each plant, how to save water, avoid common layout mistakes, and build a space that invites pollinators and daily harvests.
Pick the Sunniest Spot First

Track sunlight like a pro
Sunlight drives everything in your garden. Most vegetables need 6–8 hours of direct sun daily, especially in the morning and midday. To map your yard’s light patterns, spend a sunny summer day observing shadows—especially from trees in full leaf.
Avoid frost pockets—low-lying areas where cold air settles. These spots stay wetter and chillier, delaying growth and increasing disease risk. If your yard is partially shaded, focus on leafy greens, herbs, and root crops, which tolerate less sun.
Optimize for southern exposure
In the Northern Hemisphere, south-facing areas get the most sun. Place your main vegetable beds here. If you’re using containers or raised beds, you can reposition them to follow the sun throughout the year.
Pro tip: Use a sun calculator app or simple notebook to log sun exposure over 2–3 days. This small step prevents wasted seeds and stunted plants.
Build Healthy Soil with Raised Beds

Choose beds for better drainage
Compacted or heavy clay soil chokes roots and holds too much water. Raised beds solve this by lifting plants above poor native soil. They improve drainage, warm up faster in spring, and make it easier to control soil quality.
If you can’t build raised beds, consider deep mulching or container gardening—both protect soil structure and reduce compaction.
Test and improve your soil
Before planting, test your soil’s pH and texture. Most vegetables prefer a pH between 6.0 and 7.0. Amend acidic soil with lime; alkaline soil with compost or sulfur.
Mix in compost, aged manure, or leaf mold to boost fertility and water retention. Avoid walking on beds—use designated paths to keep soil loose and root-friendly.
Warning: Never work wet soil. It compacts easily and damages soil structure.
Design Smart Paths and Bed Sizes
Keep paths wide and functional
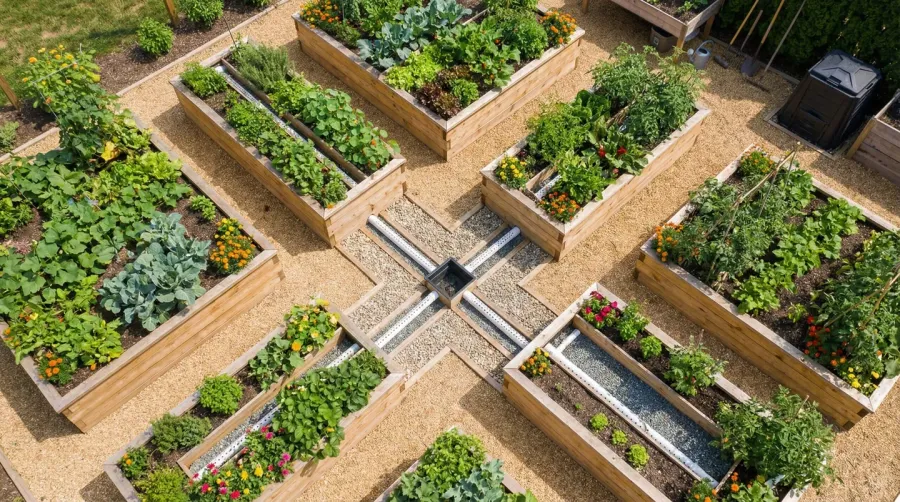
Paths aren’t just for walking—they’re work zones. Make them at least 2–3 feet wide (60–90 cm) so you can move a wheelbarrow, kneel to weed, or harvest without stepping on beds.
Use durable, low-maintenance materials:
– Wood chips – affordable, suppress weeds, break down into soil
– Gravel – long-lasting, excellent drainage
– Mowed grass – soft underfoot but needs regular upkeep
Limit bed width to 4 feet
Keep garden beds no wider than 4 feet (1.2 meters). This ensures you can reach the center from either side without compressing the soil. For taller raised beds or wheelchair access, make them 3 feet wide.
Visual cue: If you have to stretch or step into the bed, it’s too wide.
Use a Garden Planner That Works
Pick your planning method
Not all gardeners think the same way. Choose a tool that matches your style:
- Paper sketch – Great for visual planners. Use grid paper and colored pencils to map out crops.
- Spreadsheet – Ideal for tracking planting dates, harvest times, and yields.
- Digital garden planner – Tools like Garden Planner or Planter offer drag-and-drop layouts, companion planting tips, and automatic crop rotation.
Update your plan seasonally
Treat your garden plan as a living document. Note what thrived, what failed, and where pests appeared. Use this data to improve next year’s layout.
Pro tip: Take a photo of your final garden plan and post it near your seed storage—it’ll save hours of guesswork later.
Position Sun-Loving Crops Strategically
Give tomatoes and peppers prime real estate
Warm-season crops like tomatoes, peppers, eggplants, and cucumbers need full sun and shelter from wind. Place them in the sunniest, most protected zone—usually the southern part of your garden.
Avoid planting them behind tall crops or structures that cast afternoon shade.
Plant corn in blocks, not rows
Corn pollinates by wind. Planting in short, wide blocks (at least 4 rows wide) ensures better kernel development than long, single rows.
Expert note: In small gardens, grow dwarf corn varieties or skip it altogether to save space.
Place Climbing Plants to Maximize Light
Train vines upward, not outward
Vertical growers like pole beans, peas, and cucumbers can climb trellises, cages, or arches. This saves ground space and improves air circulation, reducing disease.
But remember: once leafy, they cast shade. Always place them on the north or east side of the garden (in the Northern Hemisphere) so they don’t block low-growing crops.
Grow shade-tolerant plants behind
Behind climbing plants, tuck in broccoli, kale, spinach, or salad onions. These thrive in partial shade and benefit from cooler microclimates.
In hot climates, this shaded zone becomes a cool-season refuge—perfect for growing lettuce, radishes, and beets when summer heat peaks.
Design idea: Use flowering climbers like scarlet runner beans to attract pollinators and add beauty.
Control Spreaders with Smart Placement
Keep squash and melons on the edges
Zucchini, pumpkins, sweet potatoes, and melons spread aggressively—some vines stretch 6+ feet. Plant them along bed edges or near paths so they can trail onto lawn or gravel without smothering neighbors.
Use mulch (straw or cardboard) around these plants to suppress weeds and retain moisture.
Contain runners with barriers
If space is tight, use low edging or bamboo stakes to gently guide vines in a specific direction. For container gardens, choose bush varieties of squash or cucumbers.
Common mistake: Planting zucchini in the center of a bed. Within weeks, it dominates the entire plot.
Group Plants by Water Needs

Create moisture zones
Watering every plant the same way wastes time and water. Instead, group crops by thirst level:
High-water crops (need consistent moisture):
– Lettuce
– Cucumbers
– Celery
– Basil
Low-water crops (drought-tolerant once established):
– Tomatoes
– Peppers
– Rosemary
– Oregano
Place high-water plants near your hose, rain barrel, or drip irrigation line. Drought-tolerant herbs do best in hot, well-drained spots.
Install efficient irrigation
Drip lines or soaker hoses deliver water directly to roots, reducing evaporation and fungal diseases. Set them on a timer for consistent watering—especially during dry spells.
Pro tip: Water early in the morning. It reduces evaporation and prevents leaf diseases.
Place Kitchen Crops Close to the Door
Grow herbs and greens within reach
The closer a plant is to your kitchen, the more often you’ll use it. Herbs, salad greens, cherry tomatoes, and chard should go in containers or beds near your back door.
An herb spiral or small raised bed right outside the kitchen makes snipping thyme or basil effortless.
Encourage daily harvesting
Frequent picking boosts production. Lettuce harvested leaf-by-leaf yields for weeks. Cherry tomatoes produce more when picked regularly.
Design hack: Use a bright-colored container or decorative planter for kitchen herbs—it doubles as a visual reminder to harvest.
Add Pollinators and Support Systems

Plant flowers that feed beneficial insects
A garden without pollinators is a garden with poor yields. Interplant nectar-rich flowers like:
– Calendula – attracts hoverflies and bees
– Nasturtium – lures aphids away from veggies (trap crop)
– Marigolds – repel nematodes and add color
– Poached egg plant – draws lacewings and parasitic wasps
Scatter them along paths or tuck them between vegetables.
Include essential garden helpers
Every organized garden needs support systems:
- Compost bin – place near the garden and kitchen for easy access to scraps and finished compost.
- Rain barrel – collect rooftop water to reduce tap use and lower bills.
- Cold frame or mini greenhouse – extend your season by starting seeds 4–6 weeks earlier.
Budget option: Build a DIY cold frame from an old window and scrap wood. It pays for itself in one early harvest.
Frequently Asked Questions About How to Organize a Garden
What is the best layout for a small vegetable garden?
Use raised beds no wider than 4 feet and place them in the sunniest spot. Grow vertical crops like beans on the north side, keep kitchen herbs near the door, and group plants by water needs to maximize space and efficiency.
How do I prevent my garden from becoming overgrown?
Start with a clear plan, limit aggressive spreaders like zucchini to bed edges, use mulch to suppress weeds, and harvest frequently. A well-designed layout prevents overcrowding before it starts.
Can I grow a productive garden in partial shade?
Yes. Focus on leafy greens (lettuce, spinach, kale), root crops (radishes, beets), and herbs like parsley and cilantro. Avoid sun-hungry crops like tomatoes and peppers in low-light areas.
How do I group plants by water needs effectively?
Place high-water crops like lettuce and cucumbers near your hose or irrigation system. Drought-tolerant plants like tomatoes, peppers, and herbs thrive in hot, well-drained spots. Use drip irrigation zones to match each group’s needs.
Should I rotate crops every year?
Yes. Crop rotation prevents soil depletion and reduces pests and diseases. Use a garden planner to track where you planted tomatoes, peppers, and potatoes each year, and avoid replanting in the same spot for 3 years.
What are the easiest support systems to add for a beginner gardener?
Start with a compost bin and a rain barrel. Both reduce waste and water costs. Add a simple cold frame or cloche later to extend your growing season with minimal investment.
Key Takeaways for How to Organize a Garden
Organizing your garden is a cycle of planning, observing, and improving—not a one-time task. Start with sunlight, build healthy soil in raised beds, and design paths and beds for easy access. Use a garden planner to map out crops, place sun-lovers in prime spots, and train climbers to grow upward without shading others.
Group plants by water needs, keep kitchen crops close, and invite pollinators with companion flowers. Add simple support systems like compost, rain barrels, and cold frames to boost productivity.
Your next step: Sketch your garden layout this weekend. Use grid paper or a free digital tool, apply these 10 steps, and watch your garden transform into a low-maintenance, high-yield haven.



