If you’re looking for a strong, affordable, and long-lasting way to support climbing plants in your garden, cattle panels are a game-changer. These heavy-duty fencing panels—typically 6.5 feet tall and 5 feet wide—are built for livestock but have become a favorite among gardeners for creating durable trellises. Whether you’re growing tomatoes, cucumbers, beans, or peas, cattle panels provide unmatched support, improve air circulation, and make harvesting easier by lifting crops off the ground. With just about $50 in materials, you can build a trellis system that lasts for years. In this guide, you’ll learn how to install, modify, and train plants on cattle panels—plus get pro tips for maximizing yield, safety, and garden efficiency.
Install Panels in Garden Beds
Position in 8-Foot Garden Beds
Place cattle panels across 8-foot-wide garden beds to cover the full growing area. Align the panel along the center or edge of the bed, depending on your layout. This width allows enough space for plants to climb while leaving room for walking and maintenance. Install panels before planting to avoid disturbing roots later. If your bed is narrower, you can trim the panel width slightly with a bolt cutter or angle grinder.
Drive Panels Into the Ground
For stability, drive one end of the panel at least 1 foot into the soil. Use a mallet or rubber hammer to push the bottom posts into the ground. The deeper the insertion, the more wind-resistant the structure will be. In loose or sandy soil, consider anchoring with rebar stakes driven through the bottom panel holes for extra support. Avoid placing panels where they’ll interfere with irrigation lines or buried utilities.
Secure With Tie Wraps
Use plastic zip ties (tie wraps) to fasten the panel to bed edges, stakes, or support beams. Attach them every other vertical post, using two ties per interval—one near the base and one higher up. This creates flexibility while preventing wobbling. Don’t overtighten; leave a small gap so the panel can flex in wind without breaking. Replace UV-degraded ties each season to maintain strength.
Build Dual-Arch Trellis Structures
Cut 16-Foot Panel in Half
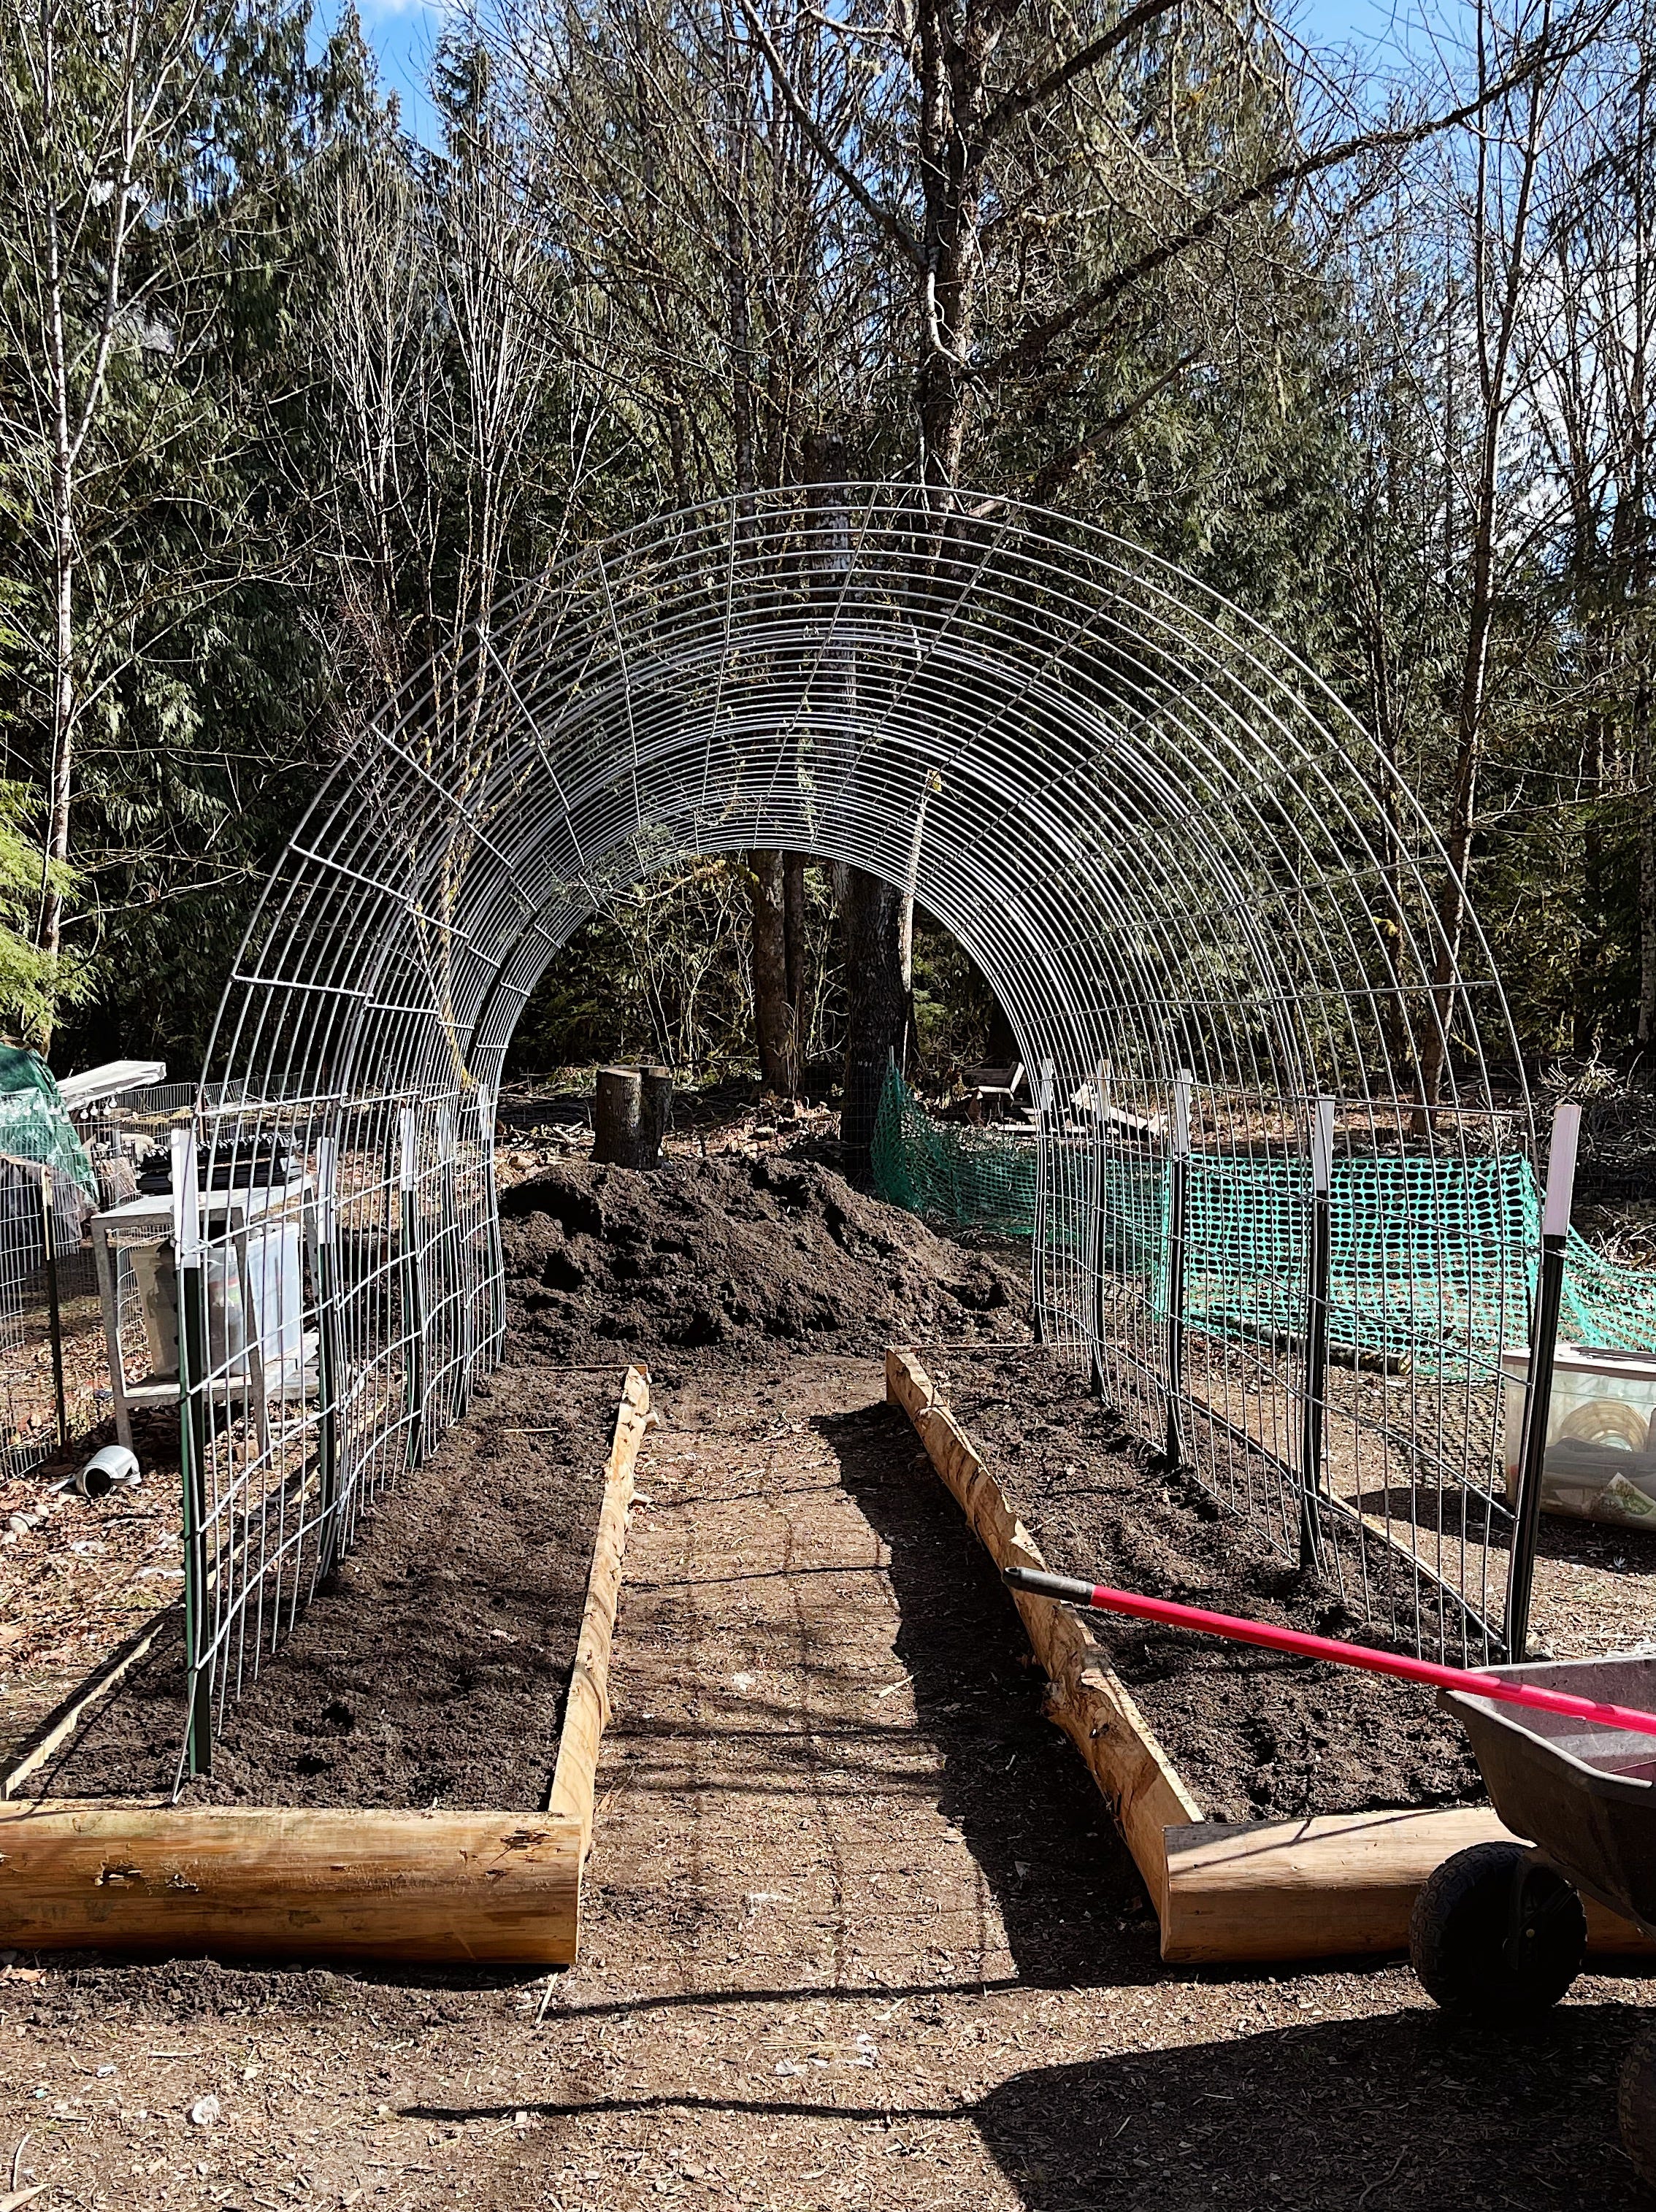
For a high-yield tunnel design, start with a 16-foot cattle panel and cut it into two 8-foot sections using bolt cutters. Bend each section into an arch and position them over the garden bed. Bring the ends together at the peak to form a continuous tunnel. This design doubles the growing surface and creates a greenhouse-like microclimate.
Form 4-Foot-Wide Arches
Push the two arches apart slightly to create a 4-foot-wide base instead of the standard 5-foot width. This makes the structure more stable and centered over typical raised beds. Use a notched wooden spacer—a small block of wood with U-shaped cuts—to lock the panels in place at the top. The spacer keeps the arches evenly spaced and prevents collapse.
Connect Tops With Tie Wraps
Secure the peak connection with multiple heavy-duty zip ties. Crisscross the ties for added strength and check them monthly for wear. The joined peak creates an 8-foot-wide ridge at the top, giving vining plants more horizontal space to spread. This is ideal for cherry tomatoes and other sprawling crops.
Reinforce With Roof Shields (Optional)
Add Protective Top Layer
In gardens with kids or foot traffic, protect the trellis top with a roof shield. Cut the bottom 1–2 feet off a second cattle panel and lay it horizontally across the peak of the arch. Secure it with zip ties to prevent people from stepping on vines or damaging the structure.
Maintain Airflow and Light
The open-grid design of the roof shield blocks physical damage while allowing sunlight and rain to pass through. It also prevents birds or pets from perching on the trellis. This reinforcement is especially useful in community gardens or backyard spaces where the trellis might get bumped during play.
Train Plants on Cattle Panel Mesh

Guide Vines From the Base
Start training plants when they reach 6–12 inches tall. Gently weave stems through the panel’s 2×4-inch grid openings. Work from the bottom up, encouraging vertical growth. For tomatoes, use the “lean-and-drop” method: guide the main stem upward, then let excess length hang down gradually to control height.
Use Plastic Plant Clips
Secure vines with plastic plant clips that snap onto the panel. These are faster and gentler than twine and won’t cut into stems. Place clips every 8–12 inches as plants grow. Clips are especially helpful for heavy crops like cucumbers and large tomatoes that need extra support.
Manage Growth Evenly
Check plants weekly and distribute vines across the panel to prevent overcrowding. Rotate stems to expose all sides to sunlight. Prune excess foliage to improve airflow and reduce disease risk. For indeterminate tomatoes, limit to 2–3 main stems per plant for best results.
Support Key Climbing Crops

Grow Tomatoes Vertically
Cattle panels excel at supporting indeterminate tomato varieties, which can grow 8+ feet tall. The rigid grid prevents branches from breaking under fruit weight. Train multiple plants along a single panel—space them 18–24 inches apart. Cherry tomatoes thrive in dual-arch tunnels, where vines drape over the top like a curtain.
Train Cucumbers and Beans
Pole beans and vining cucumbers climb naturally on the panel’s mesh. Plant seeds or transplants at the base and guide early growth upward. Vertical growing reduces powdery mildew by improving airflow and keeps fruit clean and straight. Harvest cucumbers easily from eye level instead of bending over.
Maximize Pea Production
For sugar snap or snow peas, install panels early in spring. The cool-season vines climb quickly and benefit from the wind protection of a well-anchored panel. Harvest frequently to encourage more pods. After harvest, remove vines and compost—panels are easy to clean and reuse.
Trim and Maintain Safely
Cut Sharp Edges Flush
After cutting or installing panels, use a utility knife or angle grinder to remove sharp protrusions. File down any jagged wire ends to prevent cuts. This is critical if children, pets, or frequent gardeners will be near the structure. A quick pass with a metal file ensures safe handling all season.
Inspect Ties and Anchors
At the start of each growing season, check all zip ties and ground anchors for wear. UV exposure weakens plastic over time—replace brittle or faded ties. Push panels firmly into the ground again if they’ve shifted. Reinforce loose sections with new stakes or rebar.
Prevent Rust and Damage
While cattle panels are galvanized, prolonged moisture can cause rust over years. To extend lifespan, avoid letting panels sit in standing water. Elevate slightly if possible, or use plastic caps on exposed bottom posts. Clean off plant debris at season’s end to reduce corrosion.
Customize for Garden Layouts

Adapt to Raised Beds
Fit cattle panels to standard 4×8-foot raised beds by positioning them lengthwise or across the center. For wider beds, use dual-arch designs. Secure panels to wooden frames using u-brackets or heavy-duty zip ties. This creates a permanent, clean-looking support system.
Create Walk-Through Tunnels
Build a series of dual-arch trellises down a long bed to form a walkable garden tunnel. Space arches 4–6 feet apart and connect tops with horizontal rods or additional panel pieces. Train tomatoes or grapes overhead for shade and yield. Kids love crawling through these edible tunnels.
Scale for Small Spaces
Even in compact gardens, you can use half or quarter panels. Cut a 5-foot panel down to 2–3 feet wide for narrow beds or container support. Use in greenhouses, patios, or against walls. A single panel can support multiple pots of vining plants.
Save Money vs. Commercial Trellises
Build for Under $50
A complete cattle panel trellis costs around $50, including:
• One 16-foot panel (~$30)
• Pack of heavy-duty zip ties (~$10)
• Wooden spacer and plant clips (~$10)
This is significantly cheaper than pre-made trellis systems, which can exceed $100 and last only a few seasons. Cattle panels, in contrast, last 5+ years with minimal maintenance.
Reuse Year After Year
Unlike bamboo or wooden stakes that rot, cattle panels are reusable. Store them upright in winter or leave them in place. Their durability makes them a smart long-term investment for serious gardeners. Pair with compostable twine or clips for an eco-friendly system.
Avoid Common Installation Mistakes
Don’t Skip Ground Insertion
Failing to sink the panel at least 1 foot into the soil leads to instability. Panels may tip under wind or plant weight. In windy areas, drive rebar through bottom holes and into the ground for added anchoring. Never rely solely on surface ties.
Don’t Over-Tighten Zip Ties
Too much tension can crack or warp the panel. Zip ties should hold firmly but allow slight flex. Use UV-resistant ties rated for outdoor use—they last longer than standard versions.
Don’t Wait to Train Plants
Delaying vine training results in tangled, horizontal growth that’s hard to correct. Start early—when plants are 6–12 inches tall—and guide them daily for the first week. Early training saves time and boosts yield.
Frequently Asked Questions About Using Cattle Panels in the Garden
Can cattle panels be used for tomatoes?
Yes, cattle panels are ideal for indeterminate tomato varieties. Their 6.5-foot height supports tall vines, and the sturdy grid prevents branches from breaking under fruit weight. Space plants 18–24 inches apart and train stems upward through the mesh.
How do you keep cattle panels from rusting?
To slow rusting, avoid letting panels sit in standing water. Elevate the bottom ends slightly or use plastic caps. Clean off plant residue at season’s end and store in a dry place. While galvanized, panels will last longer with proper care.
Can you cut cattle panels to size?
Yes, use bolt cutters or an angle grinder to cut cattle panels to fit your garden. Trim width for narrow beds or height for lower structures. Always file down sharp edges after cutting to prevent injury.
Are cattle panels safe around children?
Yes, when modified properly. Trim all sharp ends and consider adding a roof shield on arches to prevent kids from stepping on the structure. Use in walk-through tunnels for fun, functional garden spaces.
How long do cattle panel trellises last?
With proper installation and seasonal maintenance, cattle panel trellises typically last 5+ years. Replace UV-damaged zip ties annually and inspect anchors. Their durability far exceeds wooden or bamboo alternatives.
Can you use cattle panels in raised beds?
Absolutely. Fit panels to 4×8-foot raised beds by securing them to wooden frames with zip ties or u-brackets. Position vertically or in dual-arch tunnels. They provide strong, reusable support without rotting.
Key Takeaways for Using Cattle Panels in the Garden
Cattle panels are one of the most cost-effective, durable, and versatile tools for vertical gardening. Whether you’re building a simple single-panel trellis or a walk-through tomato tunnel, they offer unmatched strength and ease of use. By installing panels before planting, securing them deeply in the ground, and training plants early, you’ll maximize yields and minimize maintenance.
For best results, choose vining crops like indeterminate tomatoes, cucumbers, pole beans, and peas. Customize your setup with arches, roof shields, or scaled-down sections to fit any garden size. At under $50 for a full system and reusable for years, cattle panels are a smart upgrade from flimsy stakes or expensive commercial trellises. Start building your system this season and enjoy cleaner, healthier, and more productive harvests for years to come.