
Imagine stepping into your backyard and being greeted by the gentle ripple of water, the soft croak of frogs, and the shimmer of koi gliding beneath lily pads. A garden pond transforms your outdoor space into a living sanctuary—inviting wildlife, boosting curb appeal, and offering a peaceful retreat. Whether you’re starting from scratch or upgrading a dull corner of your yard, creating a garden pond is a rewarding DIY project that blends nature and craftsmanship. This guide walks you through every step—from planning and digging to stocking and maintaining—so you can build a thriving water feature that lasts for years.
You don’t need a large yard or professional help. With the right tools, materials, and sequence of steps, even beginners can install a beautiful pond in a weekend. We’ll cover how to choose the best location, size your pond correctly, prevent leaks, add plants and fish, and keep the water clear. No fluff, no filler—just actionable steps to turn your vision into reality.
Plan Your Pond Layout Before Digging

A successful pond starts with smart planning. Skipping this phase leads to uneven water levels, poor plant growth, or costly repairs down the line.
Choose a Location That Balances Sun and Shade
Pick a spot that gets 4–6 hours of sunlight daily. This supports healthy plant growth without encouraging aggressive algae blooms. Avoid placing your pond directly under trees—falling leaves clog filters, and invasive roots can puncture liners over time.
Keep the pond within view of your home for easy monitoring and enjoyment. Stay at least 10 feet away from underground utilities, septic tanks, or drainage lines. Call 811 or your local utility locator before you dig to avoid dangerous accidents.
Determine the Right Size and Shape for Your Space
Small ponds under 100 gallons work well in patios or compact gardens. Larger ponds (200+ gallons) support fish and diverse aquatic life. For koi or goldfish, dig at least 2 feet deep—30 inches in cold climates to prevent freezing.
Freeform shapes mimic natural lakes and blend into traditional landscapes. Geometric designs like rectangles or ovals suit modern yards. Use a garden hose to outline the shape on the ground—adjust until it feels balanced from all viewing angles.
Mark the Outline Clearly With Temporary Tools
Use spray paint, flour, or a garden hose to mark the pond’s perimeter. For multi-level designs, mark shallow shelves (6–12 inches deep) around the edges for marginal plants and a deeper center zone.
Walk around the marked area from different vantage points. Once excavation begins, reshaping becomes labor-intensive and messy.
Gather Tools and Materials for Installation
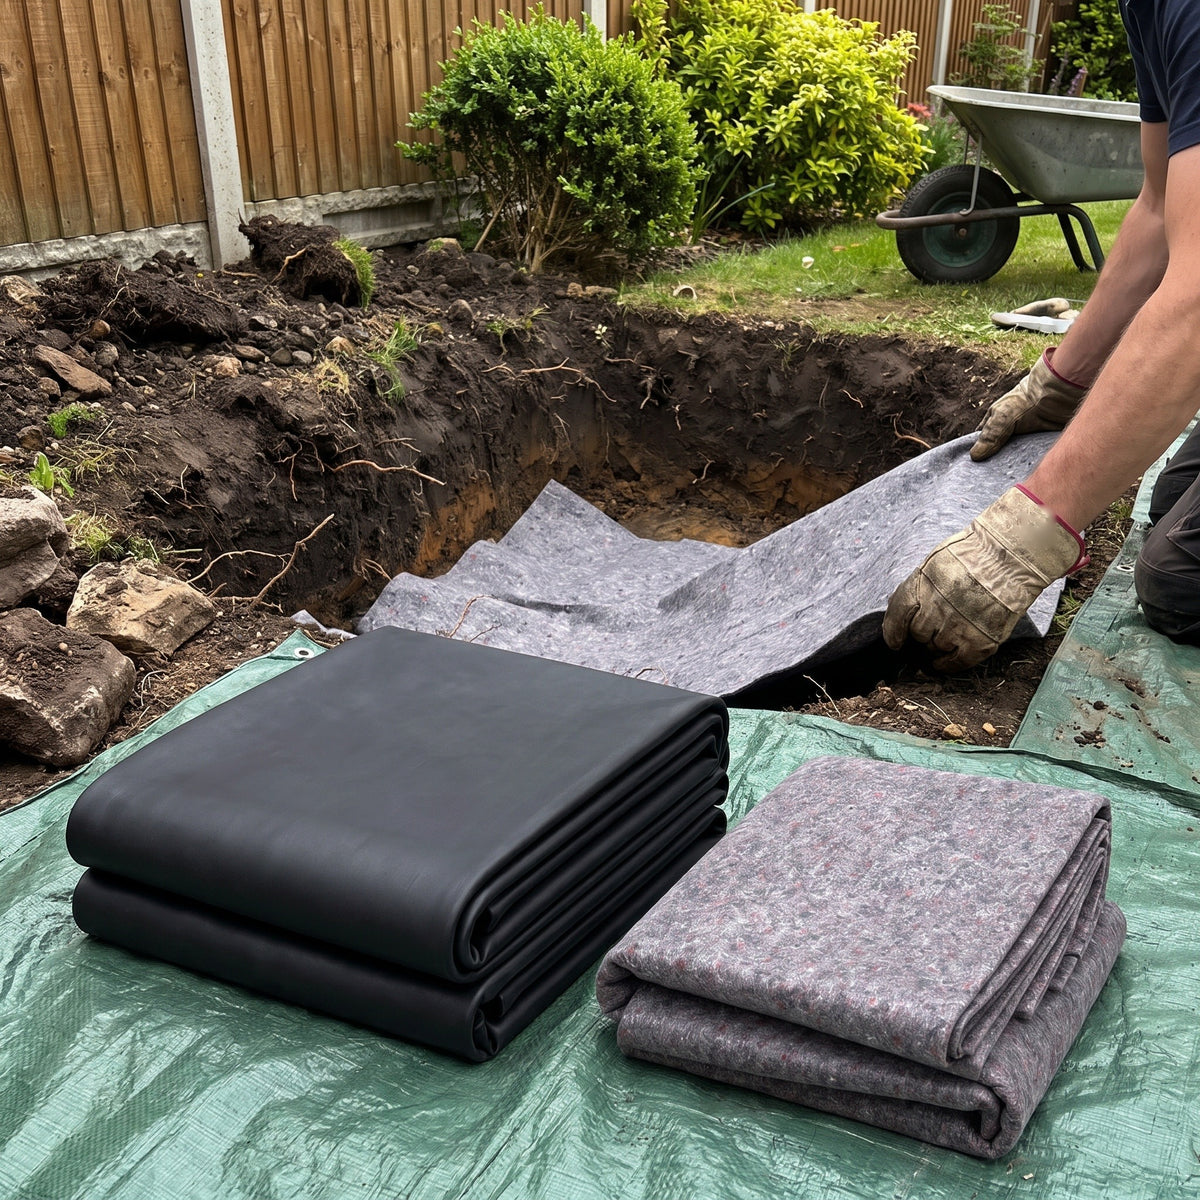
Having everything ready prevents delays and ensures a smooth build process.
Essential Tools You’ll Need for Digging and Leveling
• Shovel and flat-edged spade
• Wheelbarrow for soil removal
• Tape measure and bubble level
• Utility knife for trimming liner
• Hose or bucket for water leveling
A laser level or clear tube water level helps ensure the pond rim is perfectly even—critical for a stable liner fit.
Choose Between Flexible Liner and Preformed Pond
Two main options: flexible EPDM liner or preformed rigid shell.
EPDM rubber liners are durable, UV-resistant, and adaptable to any shape. They last over 20 years. For an 8′ x 4′ pond, buy a 10′ x 6′ liner to allow generous overlap.
Preformed ponds are easier for beginners—just dig and set. But they limit design flexibility and may crack in freezing temperatures.
Install Protective Underlayment Beneath the Liner
Always lay geotextile fabric or old carpet under the liner. It prevents punctures from rocks, roots, or sharp debris. Skipping this step risks leaks and shortens liner life.
Dig the Pond Hole to Exact Specifications
Precision during excavation ensures proper water balance and plant placement.
Follow the Marked Outline and Remove Turf First
Start digging along the marked edge. Remove grass and sod first—set it aside for reuse elsewhere in your garden.
Begin with the deepest section, usually the center. For fish ponds, dig at least 24 inches deep; go deeper in cold zones to protect fish from ice.
Build Plant Shelves at 6–12 Inches Deep
Create 12–18 inch wide shelves around the perimeter to hold potted marginal plants like cattails or irises. These shelves should be level—use a straight board and level to check flatness.
Uneven shelves cause pots to tip and water to pool on one side, leading to stagnant zones.
Check Depth and Level Frequently During Digging
Place a long board across the hole and use a level to verify evenness. Adjust soil as needed.
Fill the hole with a few inches of water during digging to reveal low spots where water collects—this helps fine-tune contours before final installation.
Install Liner and Fill the Pond Without Leaks
This stage determines whether your pond holds water or becomes a maintenance headache.
Lay the Underlayment Smoothly Over Entire Excavation
Spread geotextile fabric over the bottom, sides, and shelves. Overlap seams by 12 inches. Avoid walking on it to prevent tears.
Trim excess after the liner is in place.
Fit and Secure the Flexible Pond Liner Properly
Unroll the EPDM liner on a calm, warm day—heat makes rubber more pliable. Center it so all sides have at least 12 inches of overlap.
Gently push the liner into corners and along shelves. Do not stretch—allow slack for expansion when filled.
Begin filling with water. As the pond fills, the liner settles naturally. Smooth out wrinkles by hand, leaving deep folds until the pond is half-full.
Trim and Conceal the Liner Edge With Natural Edging
After the pond settles for 24 hours, trim the liner, leaving 6 inches of excess.
Secure the edge with stones, timber, or rocks. Overlap the liner slightly under the first row to hold it in place and hide the seam.
Set Up Pump and Filtration for Clear Water
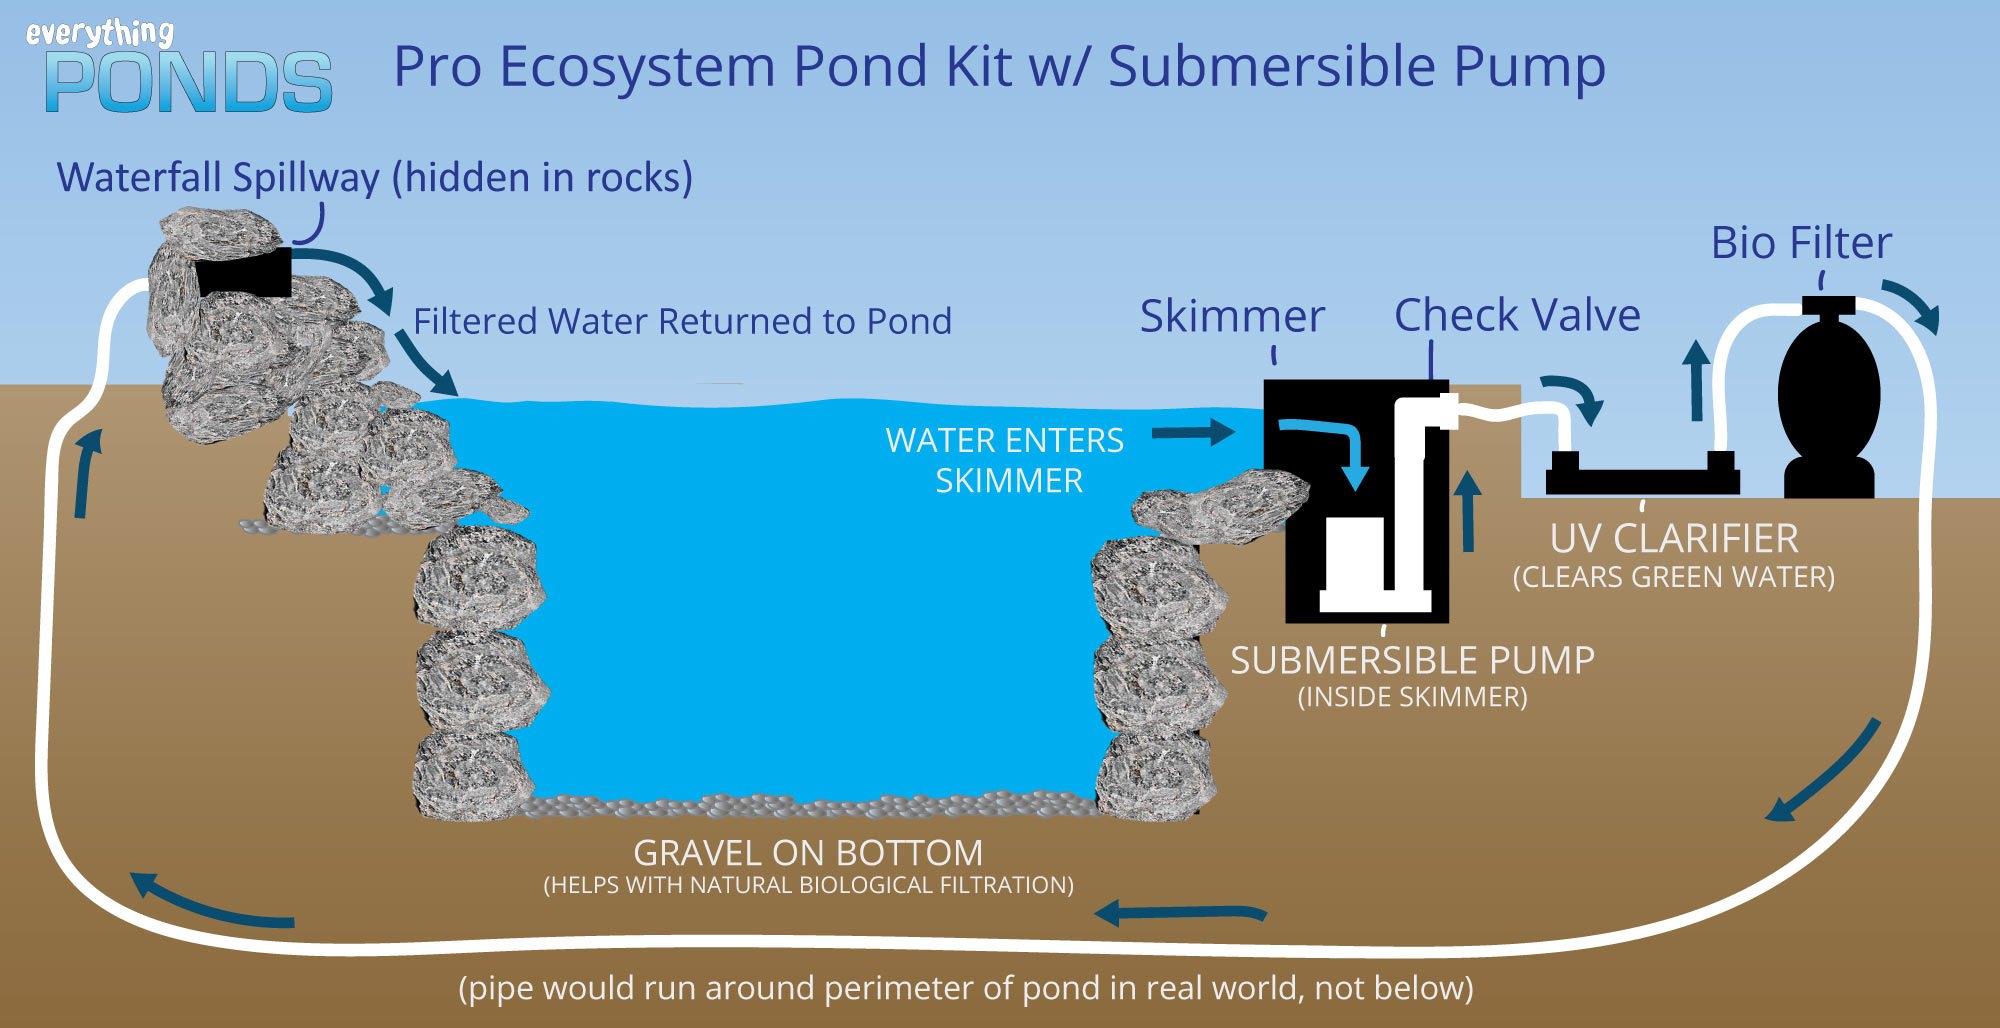
Stagnant water attracts mosquitoes and fuels algae. Proper circulation keeps your pond healthy.
Select a Pump That Circulates Full Volume Hourly
Choose a pump rated to move the entire pond volume every hour. For a 300-gallon pond, use a 300 GPH (gallons per hour) submersible or external pump.
Submersible pumps sit at the bottom; external models are easier to maintain.
Install a Biological Filter for Natural Water Cleaning
Pair the pump with a biological filter that hosts beneficial bacteria to break down fish waste and organic debris.
Use filter media like foam sponges, bio-balls, or ceramic rings to maximize surface area for bacteria.
Position the outflow to create gentle circulation—avoid strong currents that stress fish.
Hide Cords and Tubing for Safety and Aesthetics
Run power cords and tubing under mulch, rocks, or a shallow trench. Use cord covers to prevent tripping and protect from UV damage.
Never leave electrical components exposed.
Add Aquatic Plants to Balance the Ecosystem

Plants oxygenate water, reduce algae, and enhance visual appeal.
Use Four Types of Plants for a Balanced Pond
• Floating plants (water hyacinth, duckweed): Shade surface and limit algae
• Submerged plants (anacharis, hornwort): Oxygenate and filter water
• Marginal plants (iris, cattail): Grow on shelves, add height and texture
• Water lilies: Surface bloomers; need full sun and planting pots
Start with 3–5 plants in a small pond. Overcrowding leads to decay and oxygen depletion.
Plant in Mesh Baskets With Aquatic Soil
Use pond planting baskets with drainage holes. Fill with heavy clay-based soil—never potting mix, which floats away.
Top with 1 inch of gravel to keep soil in place. Place baskets on shelves or sink submerged plants to the bottom.
Avoid invasive species like parrot’s feather—check local regulations first.
Wait Before Adding Fish to Prevent Die-Off
Adding fish too soon is the #1 cause of early pond failure.
Cycle the Pond for 2–4 Weeks Before Stocking
Run the pump and filter for at least two weeks before introducing fish. This allows beneficial bacteria to colonize the filter—a process called “cycling.”
Test water with a pond kit. Ammonia and nitrites must read 0 ppm before fish are added.
Start With Hardy Fish and Acclimate Slowly
Choose goldfish or shubunkins—they tolerate temperature swings and require minimal care.
For a 200-gallon pond, start with 2–3 small fish. Overstocking degrades water quality fast.
Float the fish bag in the pond for 15–20 minutes to equalize temperature. Then slowly mix pond water into the bag over 10 minutes before release.
Maintain Your Garden Pond Year-Round
A healthy pond needs consistent but simple care.
Skim Debris Weekly and Clean Filter Monthly
Use a net or skimmer to remove leaves, bugs, and scum weekly. Prevent organic buildup that clouds water.
Rinse the filter sponge monthly in pond water only—tap water chlorine kills beneficial bacteria.
Control Algae Naturally With Plants and UV
Green water? Add more floating plants to shade the surface. Or install a UV clarifier—it destroys free-floating algae without harming fish or plants.
Avoid chemical algaecides unless absolutely necessary—they disrupt the ecosystem.
Winterize the Pond in Cold Climates
When temperatures drop below freezing:
• Remove dead plant material
• Stop feeding fish—they enter dormancy
• Use a pond heater or de-icer to keep a gas exchange hole in the ice
Never break ice with force—sound waves can injure fish. Pour warm water to melt a vent.
Fix Common Pond Problems Fast
Catch issues early to avoid bigger repairs.
Locate and Patch Leaks Within 24 Hours
If water drops more than 1 inch per day, check for leaks.
Turn off the pump. Refill and mark the level. Wait 24 hours.
If water drops, inspect the liner—especially near edges and under rocks. Patch with EPDM repair tape or a liner patch kit.
Clear Murky or Smelly Water Quickly
Cloudy water? Likely due to sediment, overfeeding, or new pond syndrome.
• Let the pond settle
• Reduce fish feeding
• Add beneficial bacteria supplements
Foul odor? Caused by decaying sludge. Clean the bottom with a pond vacuum or siphon.
Protect Fish From Herons, Cats, and Raccoons
Use motion-activated sprinklers, floating decoys, or fine mesh netting to deter predators.
Add underwater caves or PVC pipes so fish have hiding spots during attacks.
Frequently Asked Questions About Creating a Garden Pond
How long does it take to build a garden pond?
Most small to medium ponds take 1–2 weekends to install. Planning, digging, and liner setup take the longest. With preparation, you can complete the build in 2–3 days.
Do I need a permit to build a garden pond?
In most residential areas, no permit is required for ponds under 10,000 gallons or less than 2 feet deep. Check local regulations if you’re adding pumps, electricity, or fish.
Can I build a pond on a slope?
Yes, but you’ll need to level the excavation area. Building on a slope increases the risk of liner stress and uneven water levels. Use terracing or retaining walls for stability.
How do I keep leaves out of my pond?
Use a fine mesh net over the pond in fall. Or install a skimmer basket with the pump to catch debris before it sinks.
Should I use tap water to fill my pond?
Yes, but treat it first. Let water sit for 24 hours or use a dechlorinator to remove chlorine and chloramines that harm fish and bacteria.
Can I add frogs or turtles to my pond?
Yes—once the ecosystem is stable. Frogs arrive naturally if plants and shelter are present. Turtles need deeper water and basking areas. Avoid wild-caught animals; buy from reputable breeders.
Key Takeaways for Building a Successful Garden Pond
Creating a garden pond is more than a landscaping project—it’s an ecosystem you nurture. Start with careful planning, choose the right location and size, and never skip the underlayment. Install a proper pump and filter, cycle the water before adding fish, and maintain balance with plants and regular cleaning.
Even small ponds bring big rewards: wildlife visits, natural beauty, and a calming presence in your yard. Begin with a simple design, learn as you go, and let your pond evolve. Whether it’s the first frogspawn in spring or the quiet ripple at dusk, your garden pond will become a living centerpiece worth every effort.



