Mulching a garden bed is one of the most effective, low-effort ways to boost plant health, conserve water, and keep weeds at bay. When done correctly, it transforms your garden into a clean, sustainable space that thrives with less maintenance. But if you skip prep work or pile mulch against tree trunks, you risk suffocating roots, inviting pests, and harming your plants. The real power of mulching lies not in just spreading material—it’s in doing it the right way, from edge to edge and plant to soil.
In this guide, you’ll learn how to mulch a garden bed properly, step by step. You’ll discover the best tools, ideal mulch depth for different types, and critical mistakes to avoid—like the dreaded “mulch volcano.” Whether you’re refreshing an existing bed or starting a new one, these proven techniques will help your garden retain moisture, stay weed-free, and look polished for seasons to come.
Cut a Sharp Edge Around Your Garden Bed
Defining your garden bed with a clean edge stops grass from creeping in and gives your landscape a tidy, professional finish.
Use a Half-Moon Manual Edger
Grab a half-moon edger—a tool with a curved steel blade and footstep for leverage. Align it along the bed’s edge and press down firmly to slice through grass and soil. Lift out the turf and dispose of it in a wheelbarrow. Never toss it on the lawn, as it will smother the grass underneath.
Pro Tip: Cut deep enough to expose the brown topsoil and small roots. This ensures you remove the entire root system of invasive grass, preventing regrowth.
Keep the Edge Crisp with Regular Maintenance
After edging, use a string trimmer every few months to maintain a sharp line. A clean edge creates an air gap that blocks grass spread. For added durability, pair it with stones or wood edging—but even on its own, a well-cut edge makes a big difference in long-term maintenance.
Remove Old Mulch and Clear Debris First
Applying fresh mulch over old, compacted layers can suffocate roots and create pest habitats. Always start with a clean slate.
Scoop Out Thick, Matted Layers
Use a rake to pull heavy, decomposed mulch from the center of the bed. Switch to a claw garden tool near plants and shrubs to avoid damaging roots. Work carefully around delicate stems and low foliage.
Place all removed material in a wheelbarrow and haul it to your compost pile. Avoid dumping old mulch on the lawn—it kills grass and creates bare patches.
Pull Weeds and Clean Plant Litter
Before adding new mulch, remove all visible weeds, grass runners, and dead plant matter. If you mulch over live weeds, they’ll grow right through, defeating the purpose. A clean base ensures mulch makes direct contact with soil—maximizing moisture retention and weed suppression.
Fix Mulch Volcanoes Around Trees and Shrubs
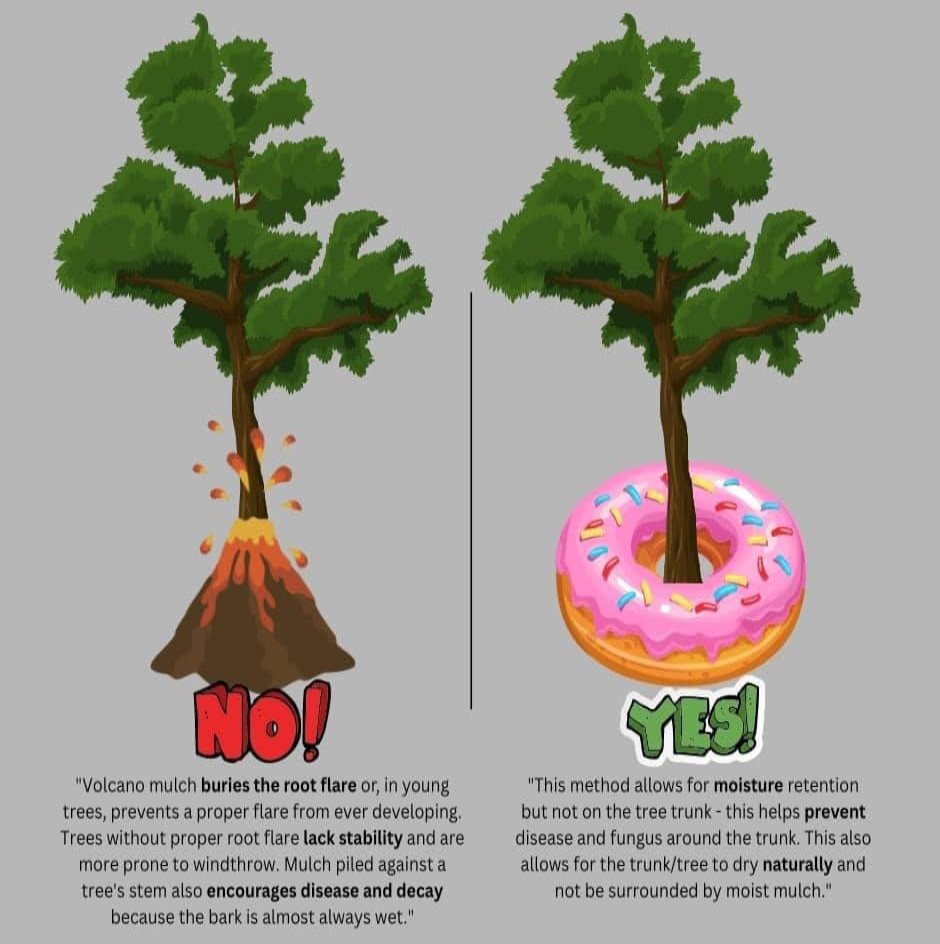
Piling mulch high around tree trunks is one of the most damaging gardening mistakes.
Locate and Expose the Root Flare
A “mulch volcano” occurs when mulch is mounded against a tree trunk. To fix it, gently remove mulch from the base until you expose the root flare—the point where the trunk widens at ground level.
Use a hand cultivator to clear away any secondary roots growing into the mulch. Cut any roots already wrapping around the trunk, as these girdling roots can strangle the tree over time.
Prevent Future Damage
Never replant or add soil—just correct the mulch. Once the trunk is exposed and dry, the tree will recover naturally. Healthy trees don’t need mulch touching their bark.
Apply the Correct Mulch Depth for Your Type

Using the right thickness ensures benefits without harming your plants.
Shredded Mulch: Stick to 2–3 Inches
For shredded wood or dyed mulch, 2–3 inches is ideal. This depth blocks sunlight from weed seeds while allowing water and air to reach roots. New beds may use up to 4 inches initially, but avoid exceeding this.
Bark Nuggets: Use 3–4 Inches
Bark nuggets break down slowly, so a 3–4 inch layer provides long-lasting coverage. Still, never pile it against plant stems.
Expert Recommendation: 1–2 Inches Is Often Enough
Ask This Old House advises just 1–2 inches for most beds. Less is often more—too much mulch leads to waterlogging, root rot, and fungal growth.
Visual Cue: Hold your hand flat—the distance from palm to fingertips is about 3 inches. Use it as a quick depth guide.
Spread Mulch the Right Way
How you apply mulch matters just as much as how much you use.
Never Dump Mulch Directly Into the Bed
Avoid dumping a full wheelbarrow load at once. It crushes edges, creates uneven piles, and risks smothering plants.
Place Mulch in Small, Even Piles
Instead, distribute mulch in small mounds across the bed. Then, use a rake to spread it outward in a smooth, uniform layer.
Keep Mulch Away from Stems and Trunks
Leave a 1–2 inch gap around all plant stems and tree trunks. This prevents rot, deters pests, and allows airflow. For trees and large shrubs, spread mulch to the drip line—the outer edge of the canopy—where roots naturally extend.
Use the Best Tools for Efficient Mulching

The right tools make the job faster, cleaner, and more effective.
Ensilage Fork for Moving Mulch
An ensilage fork (or garden fork) has 10 sharp tines, perfect for lifting and moving mulch. In just four scoops, it can fill a wheelbarrow—far more efficient than a shovel.
Rake for Leveling and Spreading
Use a wide, sturdy bow rake to smooth and level mulch after spreading. A leaf rake works well for light, shredded mulch.
Avoid the Pointed Shovel
A pointed shovel digs poorly in mulch and collects very little. It’s messy and inefficient—skip it entirely.
Avoid These Common Mulching Mistakes
Even experienced gardeners make errors that hurt plant health.
Don’t Create Mulch Volcanoes
Piling mulch around tree trunks invites rot, pests, and girdling roots. Always keep mulch flat and away from the trunk.
Don’t Mulch Over Weeds
Weeds under mulch will grow through. Remove them first—by hand or with a hoe—for lasting control.
Don’t Apply Too Much Mulch
More than 4 inches suffocates roots, blocks oxygen, and traps excess moisture. Stick to recommended depths.
Don’t Skip the Edging Step
An unedged bed invites grass invasion. A clean cut keeps your garden looking sharp and reduces long-term maintenance.
Maintain Your Mulched Garden Year-Round
Mulching isn’t a one-time task. Regular upkeep keeps your garden healthy and attractive.
Refresh Mulch Annually
Organic mulch breaks down over time. Replenish with a fresh 1–2 inch layer each spring or fall to maintain coverage.
Re-Clean Edges as Needed
Grass can creep back in. Use a string trimmer or edger every few months to maintain the air gap and clean line.
Top-Dress Instead of Rebuilding
You don’t need to remove old mulch every year—just clear debris and add a thin new layer. Only remove old mulch if it’s matted, moldy, or too thick.
Why Proper Mulching Transforms Your Garden
When done right, mulching delivers real, lasting results.
Healthier Plants and Stronger Growth
With consistent moisture, stable soil temperature, and fewer weeds, plants grow stronger and flower more. Hostas, shrubs, and perennials previously buried in mulch often rebound dramatically once properly exposed and mulched.
Cleaner, More Polished Appearance
A well-mulched bed looks intentional and cared for. It enhances curb appeal and defines your landscape without expensive hardscaping.
Less Work Over Time
Once established, a properly mulched bed needs less watering, weeding, and maintenance. The upfront effort pays off in saved time and healthier gardens.
Frequently Asked Questions About How to Mulch a Garden Bed
Should I remove old mulch before adding new?
Yes, if the old mulch is matted, moldy, or more than 3 inches thick. Remove excess layers to prevent root suffocation and pest issues. For thin, loose mulch, you can top-dress with a fresh 1–2 inch layer.
How close should mulch be to plant stems?
Keep a 1–2 inch gap around stems and trunks. This prevents rot, discourages pests, and ensures airflow. In humid climates or with sensitive plants, a slightly wider gap is safer.
Can I mulch over weeds?
No. Weeds will grow through mulch if not removed first. Pull all visible weeds and grass before applying mulch for effective suppression.
What’s the best tool for spreading mulch?
A bow rake is ideal for leveling and spreading. For moving large amounts, use an ensilage fork—it’s faster and more efficient than a shovel.
How often should I mulch my garden bed?
Refresh organic mulch once a year, typically in spring or fall. Replenish with a 1–2 inch layer to maintain benefits without over-mulching.
Why is mulch piled against trees bad?
It creates “mulch volcanoes” that trap moisture against the bark, leading to rot, pest infestations, and girdling roots. Always expose the root flare and keep mulch away from the trunk.
Key Takeaways for How to Mulch a Garden Bed
• Cut a clean edge first to block grass and define your space
• Remove old mulch and weeds before applying new
• Never pile mulch against tree trunks—expose the root flare
• Apply 1–3 inches of mulch, depending on type and climate
• Use the right tools: ensilage fork and rake for best results
• Maintain your bed with annual refreshes and edge trimming
Follow these steps, and your garden beds will stay lush, weed-free, and water-efficient for years to come. Proper mulching isn’t just about looks—it’s a smart, science-backed way to protect your plants and reduce work. Start with one bed, do it right, and see the difference for yourself.